How to Color-Code VS Code Windows Per Project Using .code-workspace
When several VS Code windows are open, it becomes easy to lose track of which project you are actually working in. Using a .code-workspace file, you can assign a unique, native window color to each workspace in minutes, with no extensions or complex setup required. This guide provides the fastest method, ready-to-use JSON examples, and a brief look at the secondary settings.json approach for single-folder projects.
Why Window Colors Matter in Multi-Project Workflows
Developers often juggle multiple codebases at once, and VS Code’s identical window styling makes it difficult to distinguish them quickly. When switching between backend services, frontend apps, infrastructure repos, or documentation folders, visual confusion slows navigation and increases the likelihood of editing the wrong file. Color-coding each workspace provides an immediate cue, reducing cognitive load in multi-window workflows.
The Multi-Window Problem: Visual Overload in VS Code
Opening several instances of VS Code is common, but they all look identical unless explicitly customized. This makes context switching inefficient, especially during debugging or when managing multiple repositories.
A Native, Low-Friction Solution: One Color per Workspace
By defining window colors inside a .code-workspace file, each project gains a visually distinct title bar. This native method requires no extensions and works consistently across platforms, making it ideal for long-term organization.
Also read : Prompty: Automate and organize your AI prompts in VS Code
Configure Native Window Colors Using a .code-workspace File
Color configuration through .code-workspace gives you centralized control over workspace behavior. It also ensures window color persists even when the folder is reopened or shared with a team. This section outlines the minimal steps required to set up workspace-specific window colors using workbench.colorCustomizations.
Step 1: Create or Open a .code-workspace File
If your project does not yet use a workspace file, open VS Code, select File then Save Workspace As, and store the resulting .code-workspace file in a convenient location. If one already exists, open it directly. Workspace files support multi-root setups and allow you to define per-project UI customizations that override global settings.
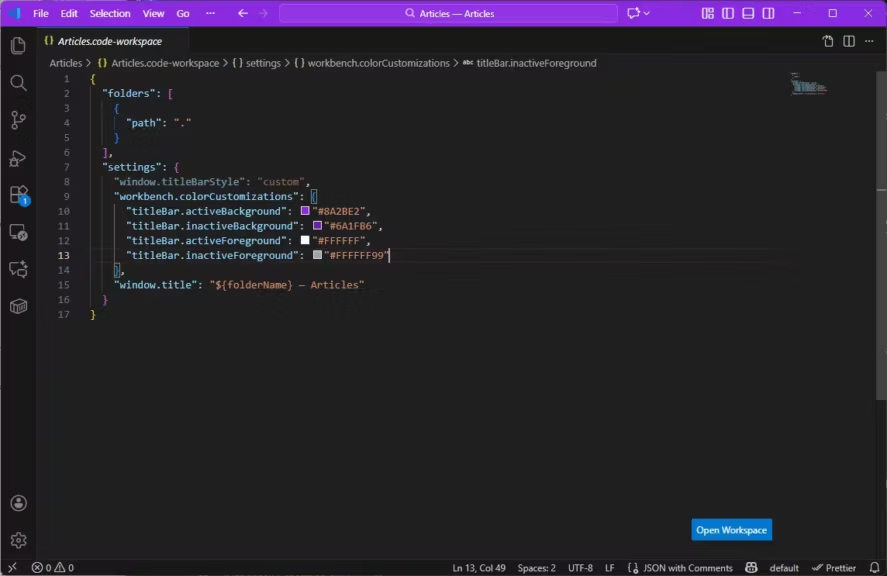
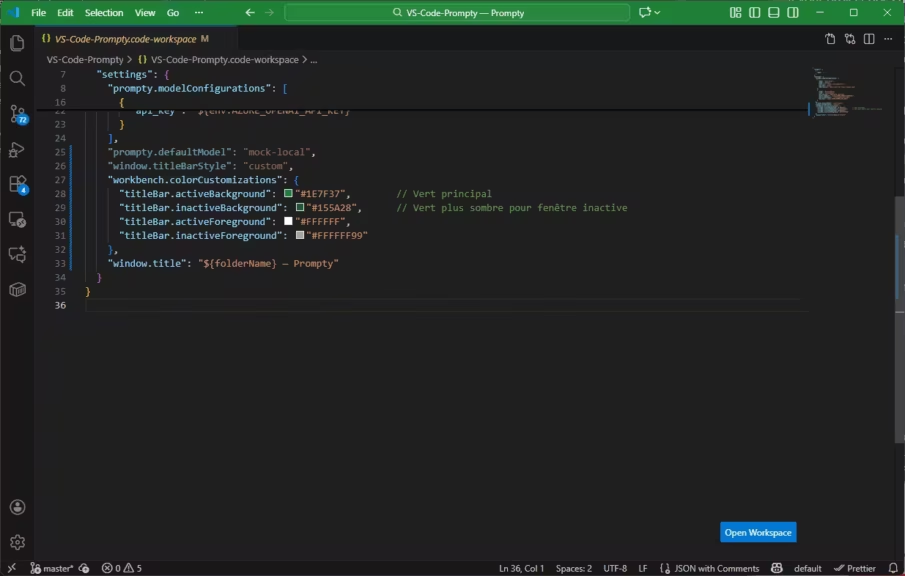
Step 2: Add workbench.colorCustomizations in JSON
Inside the settings section of the workspace file, define the colors for the window title bar. VS Code exposes several keys that control active and inactive states. Using window.titleBarStyle set to custom ensures the editor renders your colors instead of the OS defaults.
| Property | Role in the VS Code interface |
|---|---|
| titleBar.activeBackground | Background color of the title bar when the window is active |
| titleBar.activeForeground | Text and icon color in the title bar when the window is active |
| titleBar.inactiveBackground | Background color of the title bar when the window is in the background |
| titleBar.inactiveForeground | Text and icon color in the title bar when the window is inactive |
A minimal JSON example looks like this, using a green workspace color for clear visual identification:
{
  "folders": [
    { "path": "." }
  ],
  "settings": {
    "window.titleBarStyle": "custom",
    "workbench.colorCustomizations": {
      "titleBar.activeBackground": "#1E7F37",
      "titleBar.inactiveBackground": "#155A28",
      "titleBar.activeForeground": "#FFFFFF",
      "titleBar.inactiveForeground": "#FFFFFF99"
    },
    "window.title": "${folderName} ProjectNamePersonnalized-optional"
  }
}
Below are three additional ready-to-use examples: red, purple, and blue.
Red workspace example
{
  "settings": {
    "window.titleBarStyle": "custom",
    "workbench.colorCustomizations": {
      "titleBar.activeBackground": "#C62828",
      "titleBar.inactiveBackground": "#8E0000",
      "titleBar.activeForeground": "#FFFFFF",
      "titleBar.inactiveForeground": "#FFFFFF99"
    }
  }
}
Purple workspace example
{
  "settings": {
    "window.titleBarStyle": "custom",
    "workbench.colorCustomizations": {
      "titleBar.activeBackground": "#7B1FA2",
      "titleBar.inactiveBackground": "#4A0072",
      "titleBar.activeForeground": "#FFFFFF",
      "titleBar.inactiveForeground": "#FFFFFF99"
    }
  }
}
Blue workspace example
{
  "settings": {
    "window.titleBarStyle": "custom",
    "workbench.colorCustomizations": {
      "titleBar.activeBackground": "#1565C0",
      "titleBar.inactiveBackground": "#0D47A1",
      "titleBar.activeForeground": "#FFFFFF",
      "titleBar.inactiveForeground": "#FFFFFF99"
    }
  }
}
Example: A Clean Green Workspace for Infrastructure Projects
Here, green provides a calm, infrastructure-oriented look. Replace the hex codes to assign unique colors across your environments. Developers working in microservices or modular architectures often assign colors per backend service, frontend app, or tooling repository to avoid mistakes during rapid context switching.
Recommended Color Palettes for Different Project Types
Choosing consistent colors is more effective than assigning them randomly. Developers often group projects by functional category, and predictable palettes improve recognition speed when moving between windows.
Suggested Palettes for Fast Visual Recognition
A practical approach is to choose colors that contrast clearly with one another. For example, violet for frontend work, blue for backend APIs, green for infrastructure, orange for test environments, and gray or rose tones for documentation. These palettes remain readable across themes and reduce visual ambiguity.
| Project type | Recommended color | Hex code |
|---|---|---|
| Frontend | Purple | #7B1FA2 |
| Backend API | Blue | #1565C0 |
| Infrastructure | Green | #1E7F37 |
| Testing / QA | Orange | #F57C00 |
| Documentation | Light gray / pale rose | #BDBDBD |
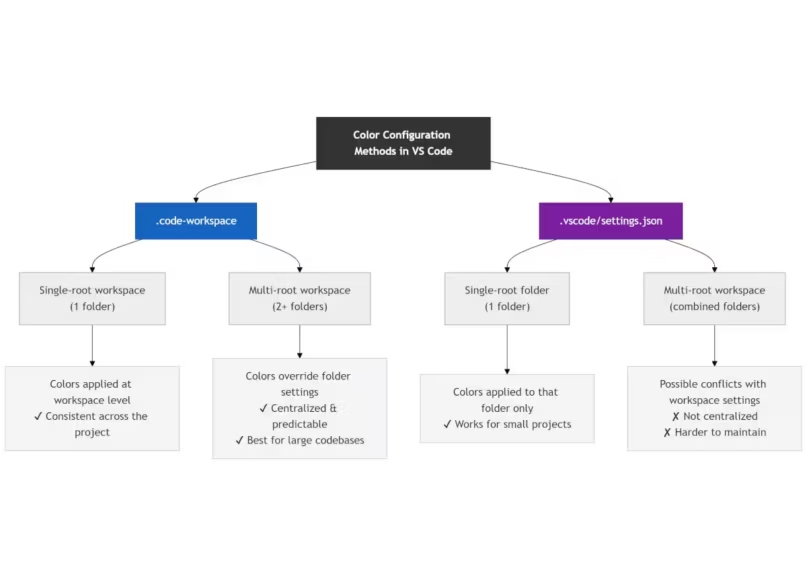
Alternative Method: Using .vscode/settings.json
While .code-workspace is recommended for multi-project setups, settings.json can be useful in situations where a developer does not want to create a workspace file. It supports the same color keys but applies only to the current folder.
When settings.json Makes Sense
If your workflow centers around a single-folder repository with no multi-root requirements, using .vscode/settings.json provides a quick override. It is also useful for temporary customization when testing themes or color configurations.
Key Limitations Compared to .code-workspace
settings.json becomes harder to maintain in larger environments because it is local to each folder. It also lacks the centralization and portability of a workspace file. In multi-root setups, .code-workspace overrides can conflict with individual folder settings, so workspace-level configuration is generally more predictable.
Troubleshooting: When VS Code Window Colors Don’t Apply
Window color settings generally apply instantly, but some configurations can cause conflicts. This section addresses common issues developers encounter when customizing title bar colors.
Check titleBarStyle, Theme Overrides, and JSON Scope
If colors are not visible, verify that window.titleBarStyle is set to custom. Some themes override specific UI elements, and high-contrast modes can suppress custom colors. Ensure that your JSON is placed under settings within the workspace file rather than at the top level.
Multi-Root and Multi-Workspace Conflicts
When a workspace contains several folders, VS Code may merge settings in unexpected ways. Conflicts between workspace and folder-level settings.json files can cause inconsistent coloring. Storing all window-color configuration at the workspace level avoids these issues.
Beyond Color: Structuring Long-Term Workspace Organization
Once each workspace is color-coded, it becomes easier to extend your setup to broader productivity practices. Workspace files can manage project-level settings, environment-specific behaviors, and team conventions.
Cohesive Workspace Design for Large Codebases
Color-coding is often the first step toward more deliberate workspace organization. Teams managing large systems benefit from consistent naming, project grouping, and environment-specific configuration that extends beyond UI customization.
| Workspace / Project | Role / Type | Environment | Recommended Color | Hex Code | Team Convention / Rationale |
|---|---|---|---|---|---|
| frontend-app | Frontend (UI) | Dev | Purple | #7B1FA2 | Bright color for quick identification of UI-related work |
| api-backend | Backend (API, logic) | Dev | Blue | #1565C0 | Stable tone commonly linked with core backend services |
| infra-config | Infrastructure / IaC | Dev | Green | #1E7F37 | Green = environment management and stability |
| test-suite | Testing / QA | Staging | Orange | #F57C00 | Warning-like color signaling QA or pre-production checks |
| docs-knowledge-base | Documentation | Dev | Light Gray | #BDBDBD | Neutral tone for non-executable knowledge projects |
| payment-service | Sensitive microservice | Prod | Red | #C62828 | Red = caution, helps avoid production mistakes |
| analytics-engine | Data / ML subsystem | Prod | Deep Blue | #0D47A1 | Darker variant to differentiate production from development |
| internal-tools | Internal tools | Dev | Teal | #00838F | High-contrast color for utility modules |
The Core Takeaway
Using a .code-workspace file provides a fast and reliable way to assign a unique window color to each VS Code project. Developers working across large codebases gain clearer visual cues, reduce mistakes when switching windows, and build a foundation for more structured workspace configuration. As teams mature their workflows, workspace files can support shared settings, environment presets, and long-term organizational clarity.
Also read : Practical guide: organize AI prompts with VS Code
Your comments enrich our articles, so don’t hesitate to share your thoughts! Sharing on social media helps us a lot. Thank you for your support!