Practical guide: organize AI prompts with VS Code
Visual Studio Code is your daily playground. A top-notch code editor with countless extensions and muscle-memory shortcuts. So why bother looking for yet another tool to organize your AI prompts when you already have the ultimate Swiss army knife at your fingertips?
Good news: VS Code is perfectly suited to become your AI prompt manager. Its native snippet system, variable handling, multi-file support and Git integration provide everything you need to structure a professional AI prompt library without leaving your development environment.
In this hands-on guide, we will turn VS Code into a command center for your AI prompt templates. You will learn how to create reusable AI snippets, use advanced variables and placeholders, organize them by workspaces and projects, and run an ultra-fast workflow from snippet to clipboard. If you already code in VS Code, you are five minutes away from having an AI prompt management system that integrates seamlessly into your developer workflow. For broader context, check out the main guide: Organize AI prompts: complete solutions guide for 2025.
Why choose VS Code to organize AI prompts?
You are already there: zero friction, smooth workflow
The golden rule of productivity: use the tools already in your stack. If VS Code runs all day on your machine for coding, leverage it to manage your prompts. No new tool to launch, no context switching, no cognitive friction.
Your workflow becomes seamless: you code a function, get stuck on the docs, hit Ctrl+Space to trigger a snippet that generates the documentation, copy it to the clipboard, paste it into ChatGPT, Claude, or another LLM, grab the result, and continue coding. All of this without leaving VS Code. Native integration that saves time.
This workflow might suit some developers, while others may prefer a more specialized solution to manage prompts, prompt templates, and track changes. Especially when maintaining a large prompt library with evaluation and annotation needs. VS Code also covers this use case through extensions, letting you dedicate a VS Code window to prompt management. If you are a bit technical, this setup is powerful and highly customizable.
Powerful native snippet system
To start simple, VS Code includes a native snippet engine that is remarkably effective. No need to install an extension, everything is already built in. These snippets support:
- Dynamic variables: $1, $2 for tabbing between fields
- Placeholders with default values: ${1:default_value}
- Multiple choices: ${1|option1,option2,option3|}
- Environment variables: e.g. $TM_FILENAME, $CURRENT_YEAR, $CLIPBOARD…
- Transformations: regex and functions on variables
This native power makes VS Code an ideal tool to create AI prompt snippets with configurable variables and a fast workflow.
Ecosystem of VS Code extensions for prompt engineering
Beyond native snippets, for more dedicated management, VS Code benefits from an ecosystem of extensions built for prompt engineering that transform it into a true AI IDE. Three major extensions stand out for professional AI prompt management:
- Prompty: the most complete tool to organize and iterate on prompts with Jinja templating, integrated versioning, and collaborative workshop features. For workflow orchestration and visual AI pipelines, Prompt Flow complements it perfectly. Prompty is the “templating” and “unit testing” component of the PromptFlow workflow.
- Microsoft AI Toolkit: Official Prompt Builder with iterative testing, structured output generation, and generation parameter tuning. It is more focused on integrating AI into application projects.
- Continue: designed for flexible conversational interaction with multiple AI backends (OpenAI, Anthropic, Ollama) and advanced context management. While Continue is not a dedicated prompt management tool, it can complement others. Its ability to connect to various APIs, whether local or enterprise servers, allows you to evaluate prompts across different models. It acts as middleware between the LLM and the VS Code environment, but not as a library manager.
These extensions professionalize AI prompt management in VS Code by adding dynamic templating, direct execution, variant comparison, and analytics. We will explore them in more detail later in this article.
File management and integrated version control
Whether you rely on native snippets or Prompty, your prompts live in files versioned with Git. Unlike cloud tools, you keep full control:
With native snippets:
- JSON files in User/snippets/ or .vscode/snippets/
- Complete history via Git (commits, branches, merges)
- Backup under your own rules
- Team sharing via GitHub/GitLab repositories
With Prompty:
- .prompty files inside your project structure
- Clear text format (YAML + Jinja)
- Versioning of both templates and test results
- Collaboration via pull requests and review processes
This file + Git approach fits naturally into a professional developer workflow. Your prompts follow the same quality rules as your code: version control, documentation, review, even CI/CD if required.
Combined with specialized extensions (Prompty, AI Toolkit), this file-based architecture makes VS Code an exceptionally complete platform for organizing and developing AI prompts. It rivals dedicated tools like PromptHub or PromptLayer, with the advantage of staying inside your familiar developer environment.
Extensions to boost AI productivity
The VS Code extension ecosystem lets you push AI prompt management even further. Beyond native snippets, several specialized extensions turn VS Code into a true prompt engineering workshop:
Generic extensions:
- Snippet Generator: quickly create snippets from selected text
- Project Snippets: workspace-specific snippets, not just global ones
- Clipboard Manager: clipboard history to easily retrieve AI outputs
- Multi-cursor editing: edit several similar snippets simultaneously
Extensions specialized for AI prompt management:
According to Microsoft and AI Toolkit guides, two extensions stand out for advanced AI prompt management in VS Code:
Prompty: the complete prompt engineering workshop
- Centralized organization of prompts with a dedicated file system
- Advanced templating with Jinja support for dynamic generation
- Workshop environment for iteration and experimentation
- Built-in versioning and prompt variant comparison
- Prompt testing, tuning, and team collaboration workflows.
- The extension is open source under the MIT license, hosted on github.com/microsoft/prompty.
- Prompty supports OpenAI, Azure OpenAI, Ollama, Mistral, and HuggingFace (via SDK), while AI Toolkit is limited to Azure/OpenAI.
- Best for: prompt engineers who want a complete development environment for prompts
Prompty transforms VS Code into a true IDE for prompts with fast testing and iteration capabilities, as highlighted by Jaouad on LinkedIn.
AI Toolkit: building and testing structured prompts
- Integrated Prompt Builder with editing and versioning
- Iterative testing and generation parameter tuning
- Generate structured outputs directly from prompts
- Multi-model support with coding assistance
- Best for: developers who want integrated testing and structured outputs
| Feature | Prompty | AI Toolkit (Prompt Builder) |
|---|---|---|
| Tool type | Complete prompt engineering workshop | Official Microsoft tool to test and structure prompts |
| Format | .prompty files in YAML + Jinja | Integrated graphical interface |
| Templating | Advanced (loops, conditions, Jinja filters) | Basic (structured text, simple variables) |
| Variables | Typed and validated | Simple input fields |
| Built-in samples | Yes, test data included in each prompt | No, requires external examples |
| Direct execution in VS Code | Yes (with run history and output comparison) | Yes (immediate execution, results displayed) |
| Compatibility LLM | Multi models : OpenAI, Azure OpenAI, Ollama, Mistral et HuggingFace | Azure/OpenAI |
| Versioning | Integrated + Git compatible | Git compatible but not natively integrated |
| Team collaboration | Strong (pull requests, review, versioning of prompts and results) | Limited (share via Git or files, no integrated workflow) |
| Learning curve | Medium (YAML + Jinja syntax to master) | Low (simple guided UI) |
| Ideal use case | Build a professional prompt library | Quickly build and test structured prompts |
| Dependencies | External APIs (OpenAI, Anthropic, etc.) | External APIs (Azure OpenAI, OpenAI, etc.) |
These extensions perfectly complement VS Code’s native snippets. You can combine both: snippets for quick generic prompts, and specialized extensions for advanced prompt engineering workflows.
Free, lightweight, cross-platform
VS Code checks all the boxes: open source, free, high-performance, available on Windows/Mac/Linux. Unlike commercial tools such as PromptLayer at $50 per user per month, or even OpenPrompt with limited free tiers, VS Code costs nothing and imposes no restrictions.
VS Code even runs in the browser via vscode.dev, without local installation. Your AI prompt snippets are accessible from any browser.
Create AI prompt snippets in VS Code
Understanding VS Code snippet architecture
VS Code snippets are defined in JSON files with a simple but powerful structure. There are three levels available:
Global snippets: available across all your projects
- File: %APPDATA%/Code/User/snippets/ (Windows) or ~/Library/Application Support/Code/User/snippets/ (Mac)
Language-specific snippets: triggered only in certain file types
- File: python.json, javascript.json, markdown.json…
Workspace snippets: tied to a single project
- File: .vscode/snippets/ inside the project folder
For organizing AI prompts, global snippets are usually the best choice since they are accessible across all your projects.
Create your first AI snippet
Open the command palette (Ctrl+Shift+P or Cmd+Shift+P) and type “Configure Snippets”. Create a new global snippet file, for example ai-prompts.code-snippets.
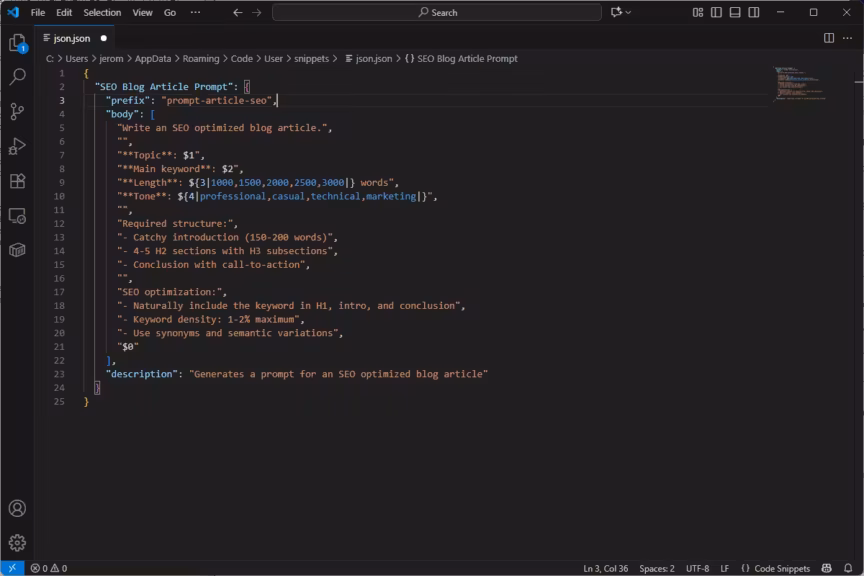
Basic structure of an AI prompt snippet:
{
  "SEO Blog Article Prompt": {
    "prefix": "prompt-article-seo",
    "body": [
      "Write an SEO optimized blog article.",
      "",
      "**Topic**: $1",
      "**Main keyword**: $2",
      "**Length**: ${3|1000,1500,2000,2500,3000|} words",
      "**Tone**: ${4|professional,casual,technical,marketing|}",
      "",
      "Required structure:",
      "- Catchy introduction (150-200 words)",
      "- 4-5 H2 sections with H3 subsections",
      "- Conclusion with call-to-action",
      "",
      "SEO optimization:",
      "- Naturally include the keyword in H1, intro, and conclusion",
      "- Keyword density: 1-2% maximum",
      "- Use synonyms and semantic variations",
      "$0"
    ],
    "description": "Generates a prompt for an SEO optimized blog article"
  }
}
Syntax breakdown:
- “prefix”: the shortcut to trigger the snippet (type prompt-article-seo then press Tab)
- “body”: the content of the prompt, line by line in an array
- $1, $2, $3: tab stops, navigate with Tab
- ${3|option1,option2|}: drop-down choice menu
- $0: final cursor position after filling everything
- “description”: helper text shown in autocomplete
Advanced snippet with variables and transformations
Let’s push the power of VS Code AI prompt snippets with environment variables and regex transformations.
{
  "Code Documentation Prompt": {
    "prefix": "prompt-code-doc",
    "body": [
      "Generate complete documentation for the following file.",
      "",
      "**File**: $TM_FILENAME",
      "**Language**: ${TM_FILENAME/(.*).([a-zA-Z0-9]+)/$2/}",
      "**Date**: $CURRENT_YEAR-$CURRENT_MONTH-$CURRENT_DATE",
      "",
      "Code to document:",
      "```$1",
      "$CLIPBOARD",
      "```",
      "",
      "Generate:",
      "1. Main file docstring",
      "2. Docstrings for each function/class",
      "3. Inline comments for complex logic",
      "4. Type hints if missing",
      "",
      "Format: ${2|Google,NumPy,Sphinx|}",
      "$0"
    ],
    "description": "Generates a prompt to document copied code"
  }
}
Variables used:
- $TM_FILENAME: name of the active file
- ${TM_FILENAME/(.*).([a-zA-Z0-9]+)/$2/}: regex extraction of file extension
- $CURRENT_YEAR, $CURRENT_MONTH, $CURRENT_DATE: current date
- $CLIPBOARD: current clipboard content
This snippet automatically grabs the code you just copied and builds a documentation prompt with context (file name, language, date). Perfect for documenting legacy code fast.
Organize AI snippets by categories
With a growing AI prompt library in VS Code, naming conventions become critical. Adopt a consistent prefix system to classify your snippets:
prompt-gen-*     : generation (code, docs, tests…)
prompt-debug-*   : debugging and error analysis
prompt-refac-*   : refactoring and optimization
prompt-explain-* : explaining code or concepts
prompt-trans-*   : translation and conversion
Practical examples:
{
  "prompt-gen-tests": "Generate unit tests",
  "prompt-gen-docstring": "Generate function docstring",
  "prompt-debug-error": "Analyze stack trace and suggest fix",
  "prompt-refac-clean": "Refactor code for readability",
  "prompt-explain-algo": "Explain complex algorithm",
  "prompt-trans-py-js": "Convert Python to JavaScript"
}
This structured naming convention lets you instantly find the right snippet. Type prompt-gen and VS Code’s autocomplete shows all your generation-related prompts.
Create a template snippet for new prompts
To speed up the creation of new AI prompt snippets, create a meta-snippet that generates the JSON structure automatically:
{
  "New AI prompt snippet": {
    "prefix": "new-prompt",
    "body": [
      ""${1:Prompt Name}": {",
      "  "prefix": "prompt-${2:category-name}",",
      "  "body": [",
      "    "${3:Main instruction}",",
      "    "",",
      "    "**Variable 1** : $1",",
      "    "**Variable 2** : $2",",
      "    "",",
      "    "${4:Detailed instructions...}",",
      "    "$0"",
      "  ],",
      "  "description": "${5:Prompt description}"",
      "},$0"
    ],
    "description": "Template to create a new AI prompt snippet"
  }
}
Type new-prompt, fill in the fields, and instantly get a complete JSON skeleton. You only need to refine the prompt details.
Use variables and placeholders for dynamic prompts
Tab variables and placeholders
The real power of VS Code AI snippets lies in dynamic variables. Instead of creating 50 versions of a similar prompt, build ONE template with variables.
Variable syntax:
"body": [
  "Simple variable: $1",
  "Variable with placeholder: ${1:default_value}",
  "Reused variable: $1 and again $1",
  "Multiple choices: ${2|option1,option2,option3|}",
  "Final position: $0"
]
Execution order:
- Cursor starts at $1
- You type or select a value
- Press Tab → cursor jumps to $2
- Continue until the final stop
- Cursor ends at $0
Practical debug prompt example:
{
  "Error analysis prompt": {
    "prefix": "prompt-debug-error",
    "body": [
      "Analyze this ${1|Python,JavaScript,Java,Go,Rust|} error and suggest a fix.",
      "",
      "**Error**:",
      "```",
      "$CLIPBOARD",
      "```",
      "",
      "**Context**: ${2:Describe execution context}",
      "**Failed attempts**: ${3:What you already tried}",
      "",
      "Provide:",
      "1. Clear explanation of the error",
      "2. Probable cause",
      "3. Recommended fix with corrected code",
      "4. How to prevent this error in the future",
      "$0"
    ],
    "description": "Analyze a copied error and propose a fix"
  }
}
Fast workflow:
- Copy your stack trace
- Type prompt-debug-error → Tab
- Select language → Tab
- Add context → Tab
- List previous attempts → Tab
- Prompt is ready to paste into ChatGPT or any LLM
VS Code environment variables
VS Code exposes environment variables you can use in your AI prompt snippets. Here are the most useful ones for AI workflow automation in VS Code:
File variables:
- $TM_FILENAME: file name (example.py)
- $TM_FILENAME_BASE: name without extension (example)
- $TM_FILEPATH: full file path
- $TM_DIRECTORY: directory of the file
Selection variables:
- $TM_SELECTED_TEXT: text selected before triggering the snippet
- $TM_CURRENT_LINE: current line of the cursor
- $TM_CURRENT_WORD: word under the cursor
Date variables:
- $CURRENT_YEAR, $CURRENT_MONTH, $CURRENT_DATE
- $CURRENT_HOUR, $CURRENT_MINUTE, $CURRENT_SECOND
System variables:
- $CLIPBOARD: current clipboard content
- $WORKSPACE_NAME: name of the active VS Code workspace
- $WORKSPACE_FOLDER: workspace folder path
Snippet using selection variables:
{
  "Refactor selected code": {
    "prefix": "prompt-refac-selection",
    "body": [
      "Refactor this ${TM_FILENAME/(.*).([a-zA-Z0-9]+)/$2/} code to improve readability and performance.",
      "",
      "**File**: $TM_FILENAME",
      "**Code to refactor**:",
      "```$1",
      "$TM_SELECTED_TEXT",
      "```",
      "",
      "Goals:",
      "- ${2|Reduce cyclomatic complexity,Improve naming,Extract functions,Remove duplication,Optimize performance|}",
      "- Preserve exact functionality",
      "- Add docstrings and type hints",
      "",
      "Return the refactored code with explanations of changes.",
      "$0"
    ],
    "description": "Refactor selected code snippet"
  }
}Workflow:
- Select code to refactor in VS Code
- Type prompt-refac-selection → Tab
- The selected code is automatically inserted into the prompt
- Choose the refactoring goal → Tab
- Prompt ready with your code and context
This approach using $TM_SELECTED_TEXT turns VS Code into an efficient contextual AI prompt generator.
Regex transformations on variables
For regex power users, VS Code allows advanced transformations on variables. Syntax: ${VARIABLE/regex/replacement/options}.
Useful transformation examples:
{
  "Transform examples": {
    "prefix": "demo-transform",
    "body": [
      "File: $TM_FILENAME",
      "Extension: ${TM_FILENAME/(.*).([a-zA-Z0-9]+)/$2/}",
      "Uppercase name: ${TM_FILENAME_BASE/(.*)/${1:/upcase}/}",
      "Parent path: ${TM_DIRECTORY/(.*)[/](.*)/$1/}",
      "",
      "Uppercase selected text:",
      "${TM_SELECTED_TEXT/(.*)/${1:/upcase}/}",
      "",
      "First line of clipboard:",
      "${CLIPBOARD/([^n]*).*/First line: $1/}"
    ]
  }
}
Concrete use case: automatically extract the language from the file extension to set syntax highlighting in your prompt:
{
  "Explain code auto-detect": {
    "prefix": "prompt-explain-auto",
    "body": [
      "Explain this ${TM_FILENAME/(.*).([a-zA-Z0-9]+)/$2/} code line by line.",
      "",
      "```$TM_FILENAME/(.*).([a-zA-Z0-9]+)/$2/",
      "$CLIPBOARD",
      "```",
      "",
      "Provide:",
      "1. Overview of what the code does",
      "2. Line-by-line explanation of complex parts",
      "3. Key concepts used",
      "4. Suggestions for improvement",
      "$0"
    ]
  }
}
The language is automatically detected from the file extension (.py → py, .js → js). One less prompt variant to maintain.
Combine snippets for modular prompts
To avoid duplication and build modular AI prompts, one useful trick is to copy reusable blocks into the clipboard with intermediate snippets and then assemble them into full prompts. VS Code does not support dynamic injection between snippets; using the clipboard remains a workaround, not a native composition method.
Two-step approach:
- Component snippets: copy only their content into the clipboard
- Full prompt snippets: insert those components via $CLIPBOARD
Example:
{
  "JSON format component": {
    "prefix": "comp-format-json",
    "body": [
      "The result must be valid JSON:",
      "```json",
      "{",
      "  "result": "...",",
      "  "confidence": 0.95,",
      "  "metadata": {}",
      "}",
      "```"
    ],
    "description": "Reusable JSON format instruction"
  },

  "Extraction prompt with JSON format": {
    "prefix": "prompt-extract-json",
    "body": [
      "Extract the following information: ${1:list of fields}",
      "",
      "**Source text**:",
      "$CLIPBOARD",
      "",
      "Formatting instruction: [Paste JSON format component here]",
      "$0"
    ]
  }
}Workflow:
- Type comp-format-json → copy the block
- Type prompt-extract-json → paste the component where indicated
This modular approach reduces duplication and centralizes reusable instructions. Update the JSON component once and all prompts using it will automatically be up to date next time you generate them.
Use Prompty for professional AI prompt management
Install and configure Prompty
If you want to go beyond snippets and adopt a professional prompt engineering environment, Prompty is worth considering.
Installation:
- Go to Extensions → search for “Prompty”
- Install the official extension
- Create a prompts/ folder in your project
- Create your first file, e.g. code-generation.prompty
Structure of a Prompty file:
---
name: Code Documentation Generator
description: Generates comprehensive documentation for code files
model:
  api: openai
  configuration:
    type: gpt-4
    temperature: 0.7
    max_tokens: 2000
sample:
  language: python
  code: |
    def calculate_fibonacci(n):
        if n <= 1: return n
        return calculate_fibonacci(n-1) + calculate_fibonacci(n-2)
---
system:
You are an expert technical writer. Generate clear and comprehensive documentation.

user:
Language: {{language}}
Code to document:
{{code}}

Generate:
1. Overview of functions/classes
2. Parameter descriptions with types
3. Return value explanation
4. Usage examples
5. Edge cases and error handling
Advantages of Prompty vs snippets:
- Full Jinja templating: loops, conditions, filters for complex dynamic prompts
- Typed variables: input validation before execution
- Integrated samples: test data included for quick trials
- Direct execution: run prompts without leaving VS Code
- Run history: compare results across executions
- Built-in versioning: track every change made to prompts
Prompty workflow for AI prompt development
Prompty turns prompt engineering into a real development discipline:
1. Creation: new .prompty file with YAML structure
2. Iteration: edit the template and adjust variables
3. Testing: run directly with sample data, check outputs
4. Comparison: run multiple variants and compare results
5. Validation: select the best performing version
6. Versioning: commit changes in Git with clear history
7. Production: use the validated prompt in your workflows
This methodology professionalizes AI prompt management and ensures quality and reproducibility.
Organize a Prompty library for teams
For collaborative AI prompt management, structure your Prompty repository like a professional codebase:
prompts-team/
├── generation/
│   ├── code-docs.prompty
│   ├── unit-tests.prompty
│   └── api-endpoints.prompty
├── refactoring/
│   ├── cleanup.prompty
│   └── performance.prompty
├── debugging/
│   ├── error-analysis.prompty
│   └── bug-investigation.prompty
├── samples/
│   └── sample-data.json
└── README.md
Each .prompty file becomes a versioned, tested, and documented asset. Team members contribute via pull requests and reviews, just like with regular code.
File, project, and workspace organization
File structure for AI snippet libraries
With a growing collection of VS Code snippets for AI prompts, file organization becomes critical. Several approaches are possible:
Approach 1: One file per category
snippets/
├── prompts-generation.code-snippets
├── prompts-debug.code-snippets
├── prompts-refactoring.code-snippets
└── prompts-documentation.code-snippetsPros: easy navigation, logical grouping
Cons: JSON files may grow large and harder to edit
Approach 2: One file per programming language
snippets/
├── prompts-python.code-snippets
├── prompts-javascript.code-snippets
├── prompts-sql.code-snippets
└── prompts-general.code-snippetsPros: snippets triggered based on file context
Cons: duplication for multi-language prompts
Approach 3: Mixed (category + scope)
snippets/
├── global/
│   ├── prompts-generation.code-snippets
│   ├── prompts-debug.code-snippets
│   └── prompts-docs.code-snippets
└── workspace/
    └── .vscode/
└── project-prompts.code-snippetsRecommendation: start with approach 1 (by category), then refine based on your needs. For teams, version these files in a shared Git repository.
Global vs workspace snippets
Global snippets are available in all your projects. Ideal for generic AI prompts (generate docstring, explain code, debug error). They live in your VS Code user profile.
Workspace snippets are stored inside the .vscode/snippets/ folder of a specific project. They are perfect for project-specific prompts: generating test data, documentation style, internal API patterns. They travel with the repository and are automatically shared with the team.
Best practice: keep your generic prompts as global snippets and your project-specific prompts as workspace snippets. This balance ensures you don’t pollute your autocomplete list while maintaining context when needed.
Sync AI prompts across machines
If you work on multiple machines (desktop, laptop, server), synchronizing your AI prompt snippets in VS Code is essential.
Option 1: Git repository
- Create a vs-code-snippets Git repo
- Symlink the User/snippets/ folder to your repo
- Commit and push your changes regularly
- Clone the repo on each machine
Option 2: VS Code Settings Sync
- Enable Settings Sync (gear icon → Turn On Settings Sync)
- Log in with your GitHub or Microsoft account
- Snippets are synced along with settings, themes, and keybindings
Option 3: Cloud storage
- Move your snippets/ folder to a cloud-synced directory (OneDrive, Google Drive, Dropbox)
- Create a symlink from the VS Code snippets folder to the cloud folder
- Snippets update automatically across machines
For professional workflows, Git + Prompty is the most robust solution. For personal use, Settings Sync is simpler and reliable.
Optimize AI prompt workflow in VS Code
Keyboard shortcuts and snippet triggers
The more you use AI prompt snippets in VS Code, the more you should optimize their triggering. A few techniques:
- Short prefixes: use pdoc instead of prompt-doc
- Category prefixes: gen-, debug-, refac-
- Auto-trigger: enable quick suggestions on typing prompt or gen
- Custom keybindings: bind Ctrl+Alt+P to “Insert Snippet”
- Multi-cursor: insert the same prompt in multiple places at once
This makes your AI productivity with VS Code even faster by reducing keystrokes.
Clipboard workflow and prompt chaining
A powerful productivity trick is to use the $CLIPBOARD variable to build a fast copy → paste → run loop. This allows you to chain AI prompts and accelerate your workflow.
Example: translate then summarize
- Copy the original text to translate
- Type prompt-trans-en → AI translates text into English, copy result
- Type prompt-summarize → AI summarizes the translated text
This chaining creates modular reusable snippets you can combine depending on your task: translation, summarization, formatting, testing, code generation.
Prompt chaining example:
{
  "Translate to English": {
    "prefix": "prompt-trans-en",
    "body": [
      "Translate this text into English:",
      "",
      "$CLIPBOARD",
      "",
      "Keep technical terms as is, preserve formatting."
    ]
  },

  "Summarize text": {
    "prefix": "prompt-summarize",
    "body": [
      "Summarize the following text in ${1|5,10,15|} bullet points:",
      "",
      "$CLIPBOARD",
      "",
      "Keep the most important facts and technical details."
    ]
  }
}Workflow:
- Copy any technical article or doc
- Run prompt-trans-en, copy result
- Run prompt-summarize, copy result
- You now have a translated and summarized version ready for reuse
This clipboard chaining workflow makes VS Code an efficient AI companion for research, documentation, and content adaptation.
Integrate AI prompts with Git and CI/CD
Since your AI prompt snippets and .prompty files are versioned in Git, you can treat them as first-class citizens in your development workflow:
- Git branching: experiment with new prompt variants on a branch
- Pull requests: teammates review prompt changes
- Tags: mark stable prompt versions
- CI/CD pipelines: automatically run evaluation tests on prompts (quality metrics, cost per run, accuracy)
- Automated backups: ensure prompt history is preserved like code
For example, you can create a prompt-evaluation.yml GitHub Action that tests your main prompts against a dataset and reports the quality score. This practice is becoming common in enterprise AI teams.
Limitations of VS Code for AI prompt management
Despite its power, VS Code is not a perfect solution for AI prompt management. Some limitations remain:
- No native search or tagging: you need to rely on file search or naming conventions
- No built-in analytics: unlike dedicated tools, VS Code does not track prompt success rate or usage
- Limited collaboration: Git helps, but there is no native team UI like in PromptHub or OpenPrompt
- No evaluation pipelines by default: you need to set them up manually via scripts or CI/CD
- Learning curve: JSON syntax for snippets, Jinja for Prompty, regex for transformations
For solo developers and small teams, these drawbacks are minor compared to the flexibility and free cost of VS Code. For large organizations with hundreds of prompts, a dedicated tool may complement VS Code.
Conclusion: VS Code, a complete environment for AI prompt management
VS Code is much more than a code editor. With its native snippets, Prompty extension, and AI Toolkit, it becomes a powerful platform to organize AI prompts for developers. Whether you want to create simple reusable snippets, build a structured library, or run professional workflows with versioning and testing, VS Code offers the flexibility you need.
For individual developers, snippets provide a fast, lightweight way to integrate prompt engineering directly into daily coding. For teams, Prompty and Git workflows enable collaboration, reproducibility, and scalability. And for those who want to push further, extensions like AI Toolkit bring advanced evaluation and integration features.
Bottom line: if you already live in VS Code, you don’t need yet another tool to manage your AI prompts. The editor you use daily can already serve as your AI prompt library, management system, and productivity booster.
For a broader perspective and alternative solutions, see the main guide: Organize AI prompts: complete solutions guide for 2025.
Related articles in this series:
Your comments enrich our articles, so don’t hesitate to share your thoughts! Sharing on social media helps us a lot. Thank you for your support!